Intro to formulas
In a Notion database, you can add a formula property that lets you run all kinds of calculations and functions based on other properties. You can use formulas to manipulate existing data and arrive at many other helpful values 🔮
Notion formulas can perform helpful calculations using your existing database properties, built-ins, and functions.
Let’s look at a few different ways to use formulas. If you’re ready to get started building your own, jump to our instructions on creating a formula below →
Example 1: Project management
In this example, we’ll use three formulas to track the progress of projects.

You can explore and play with the formula setups for this example by duplicating this page to your workspace!
Goal | Property name | Formula | Functions and built-ins used |
|---|---|---|---|
Set a project’s due date as two weeks after its start date | Due date |
|
|
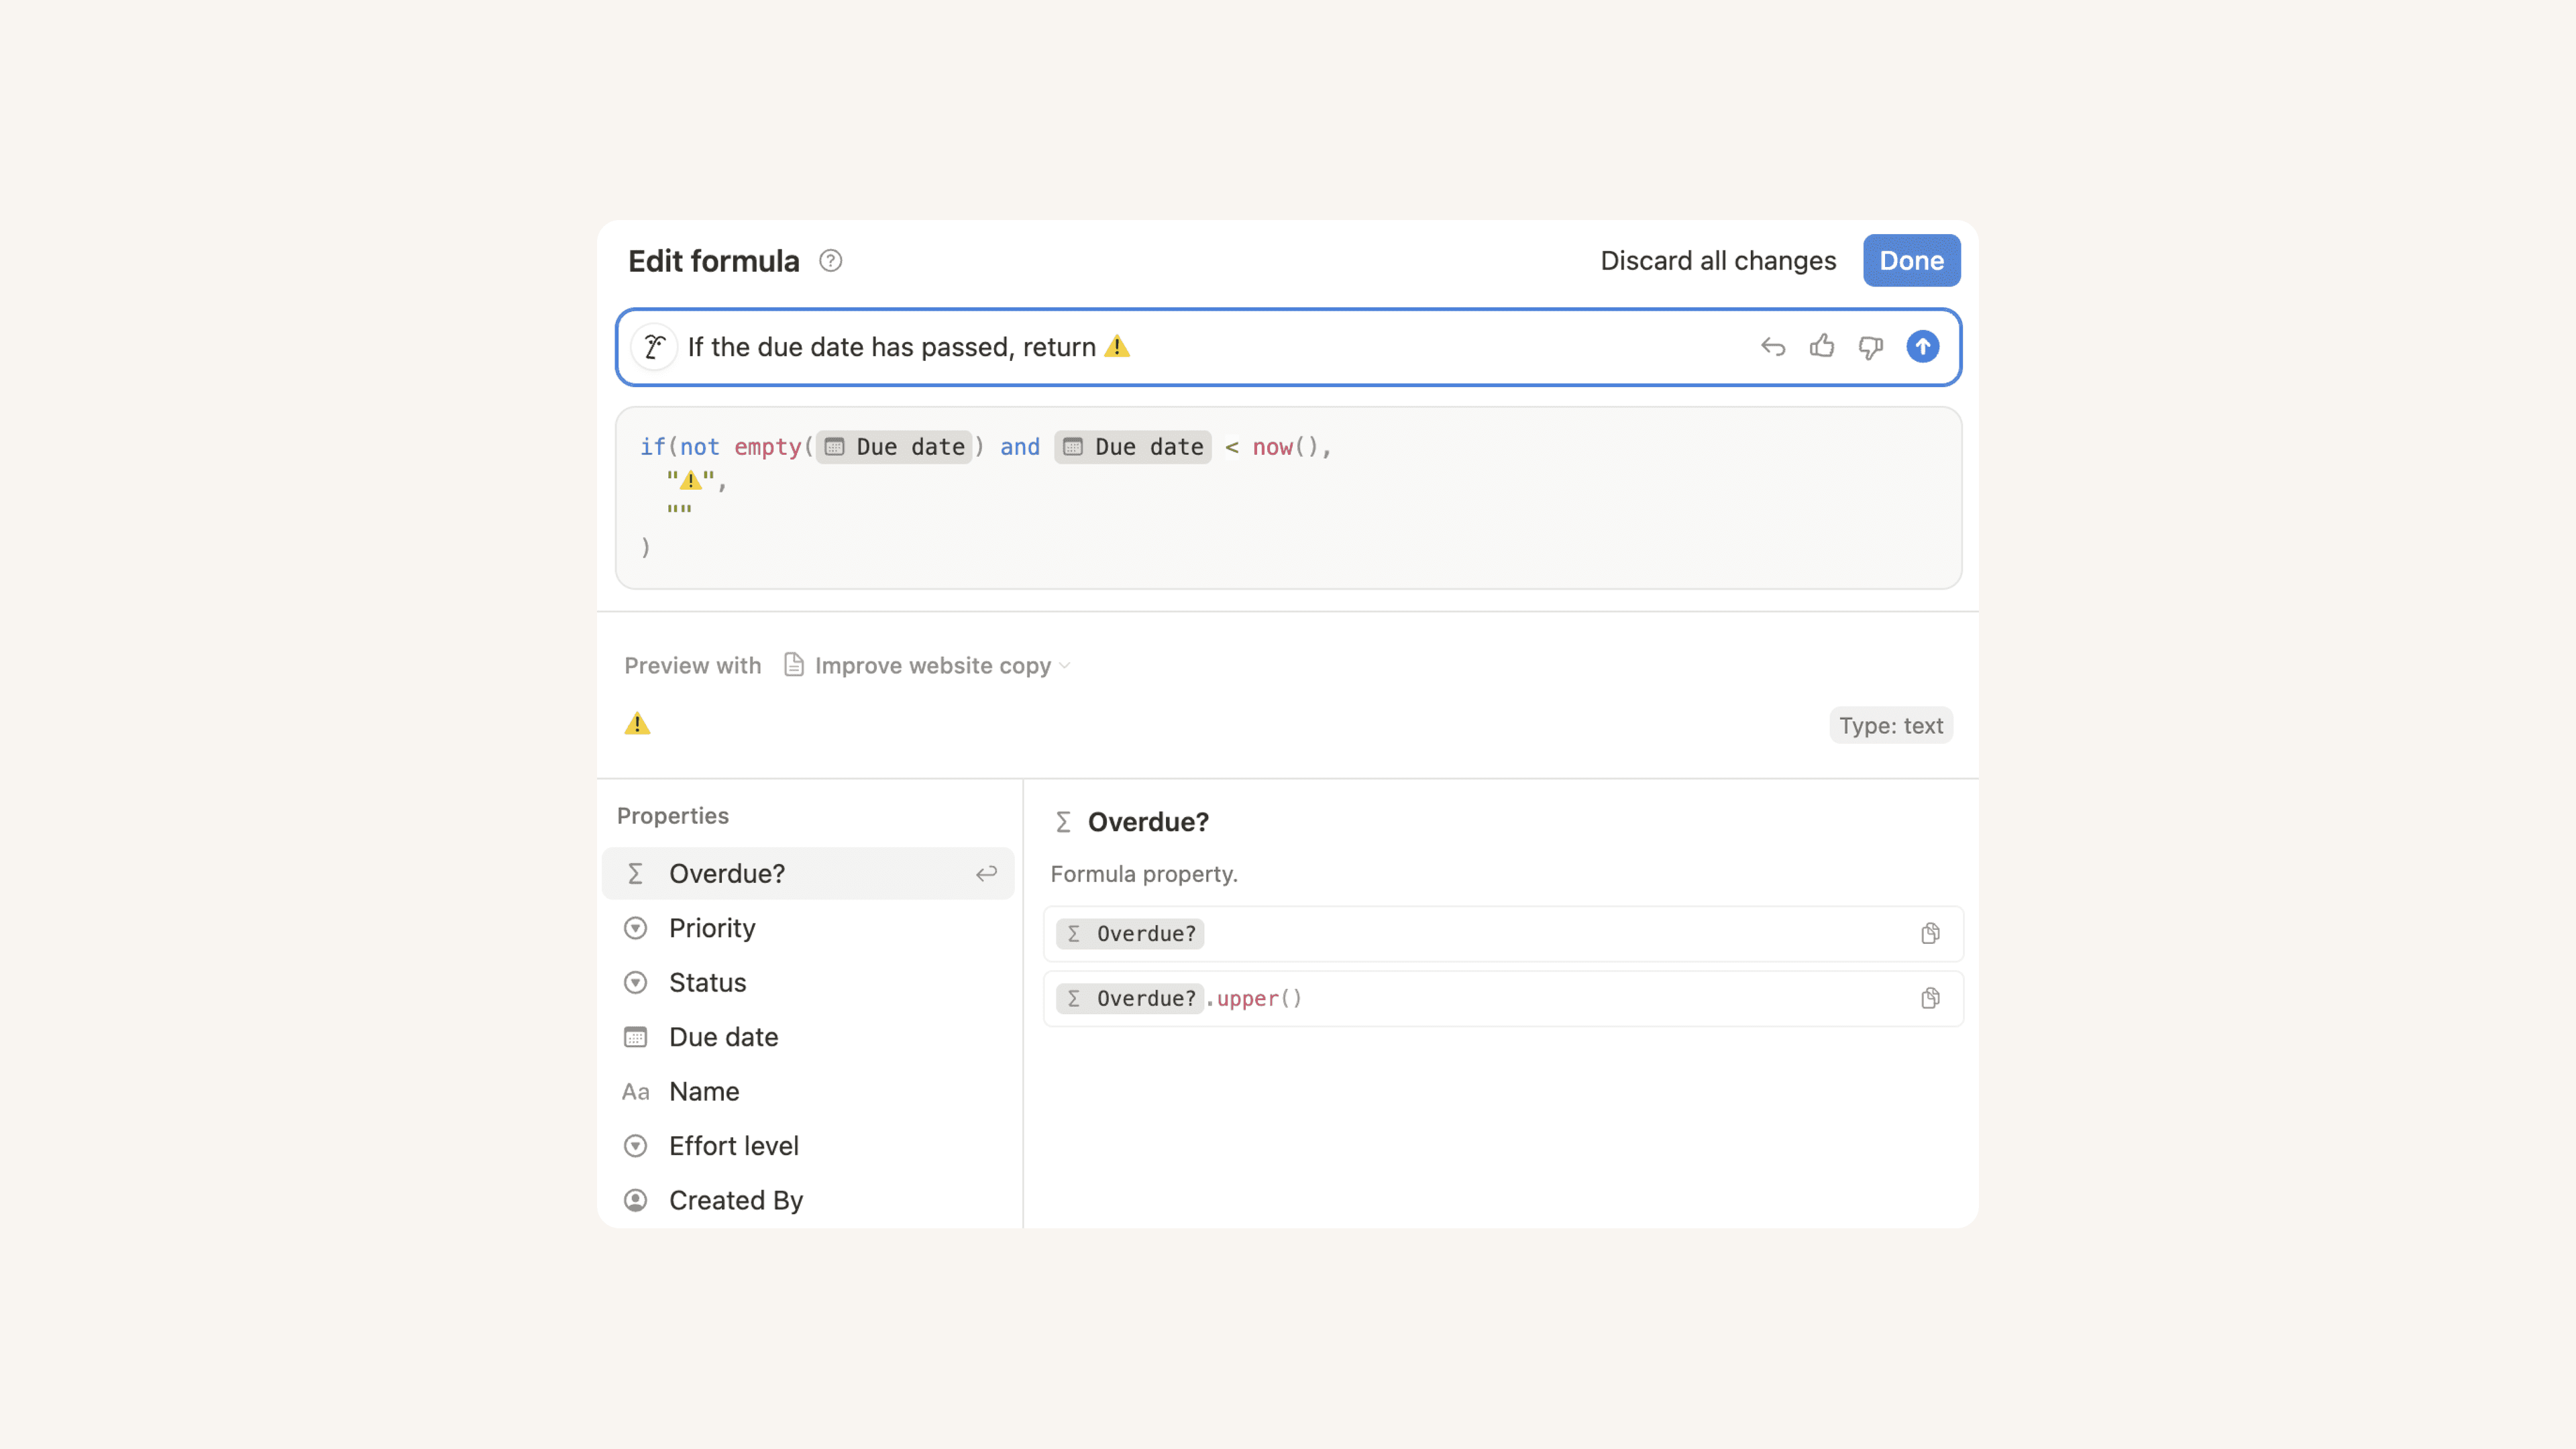
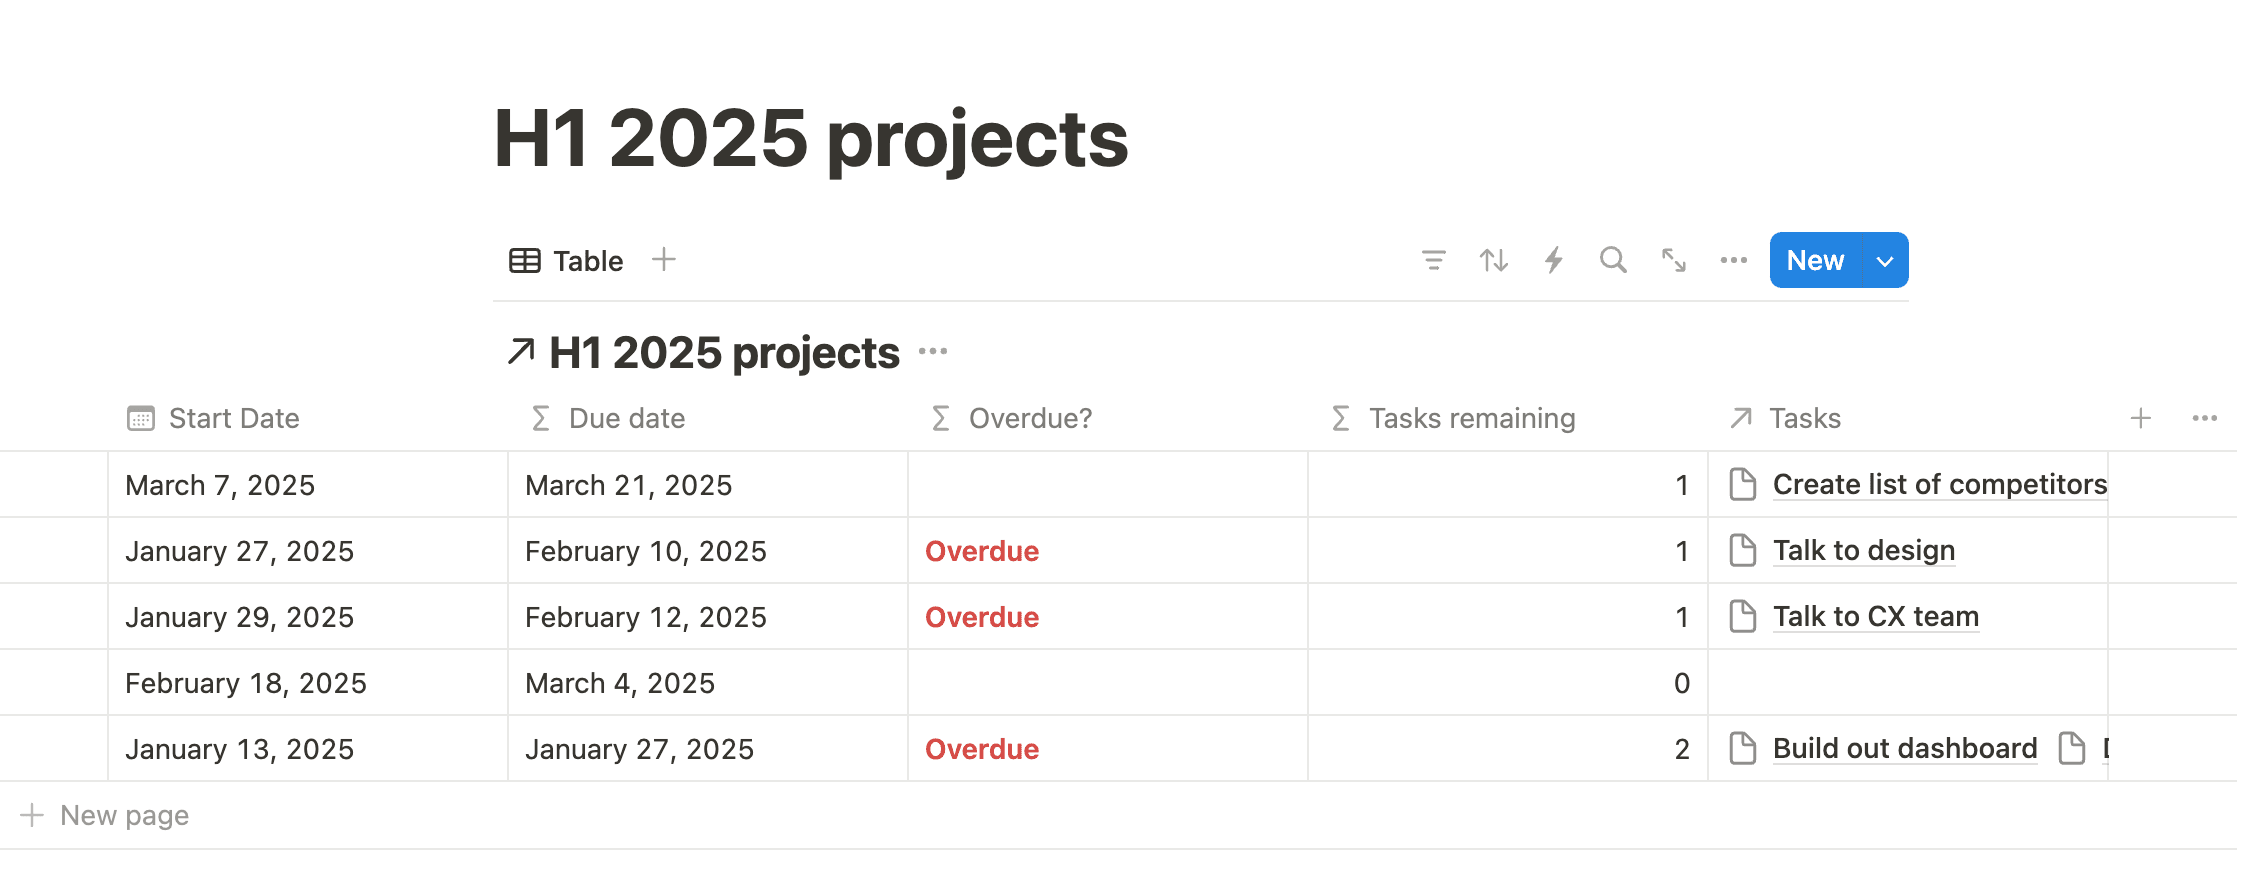
Mark a project as overdue if the due date has passed and its status is not Mark a project as overdue in bold, red letters if the due date has passed and its status is not | Overdue? |
|
|
Show the number of tasks associated with a project | Tasks remaining |
|
|
Example 2: Project brainstorming
In this example, we’ll use two formulas to brainstorm project ideas, calculate a priority score for each of them, and count the number of upvotes each project receives.
Goal | Property name | Formula |
|---|---|---|
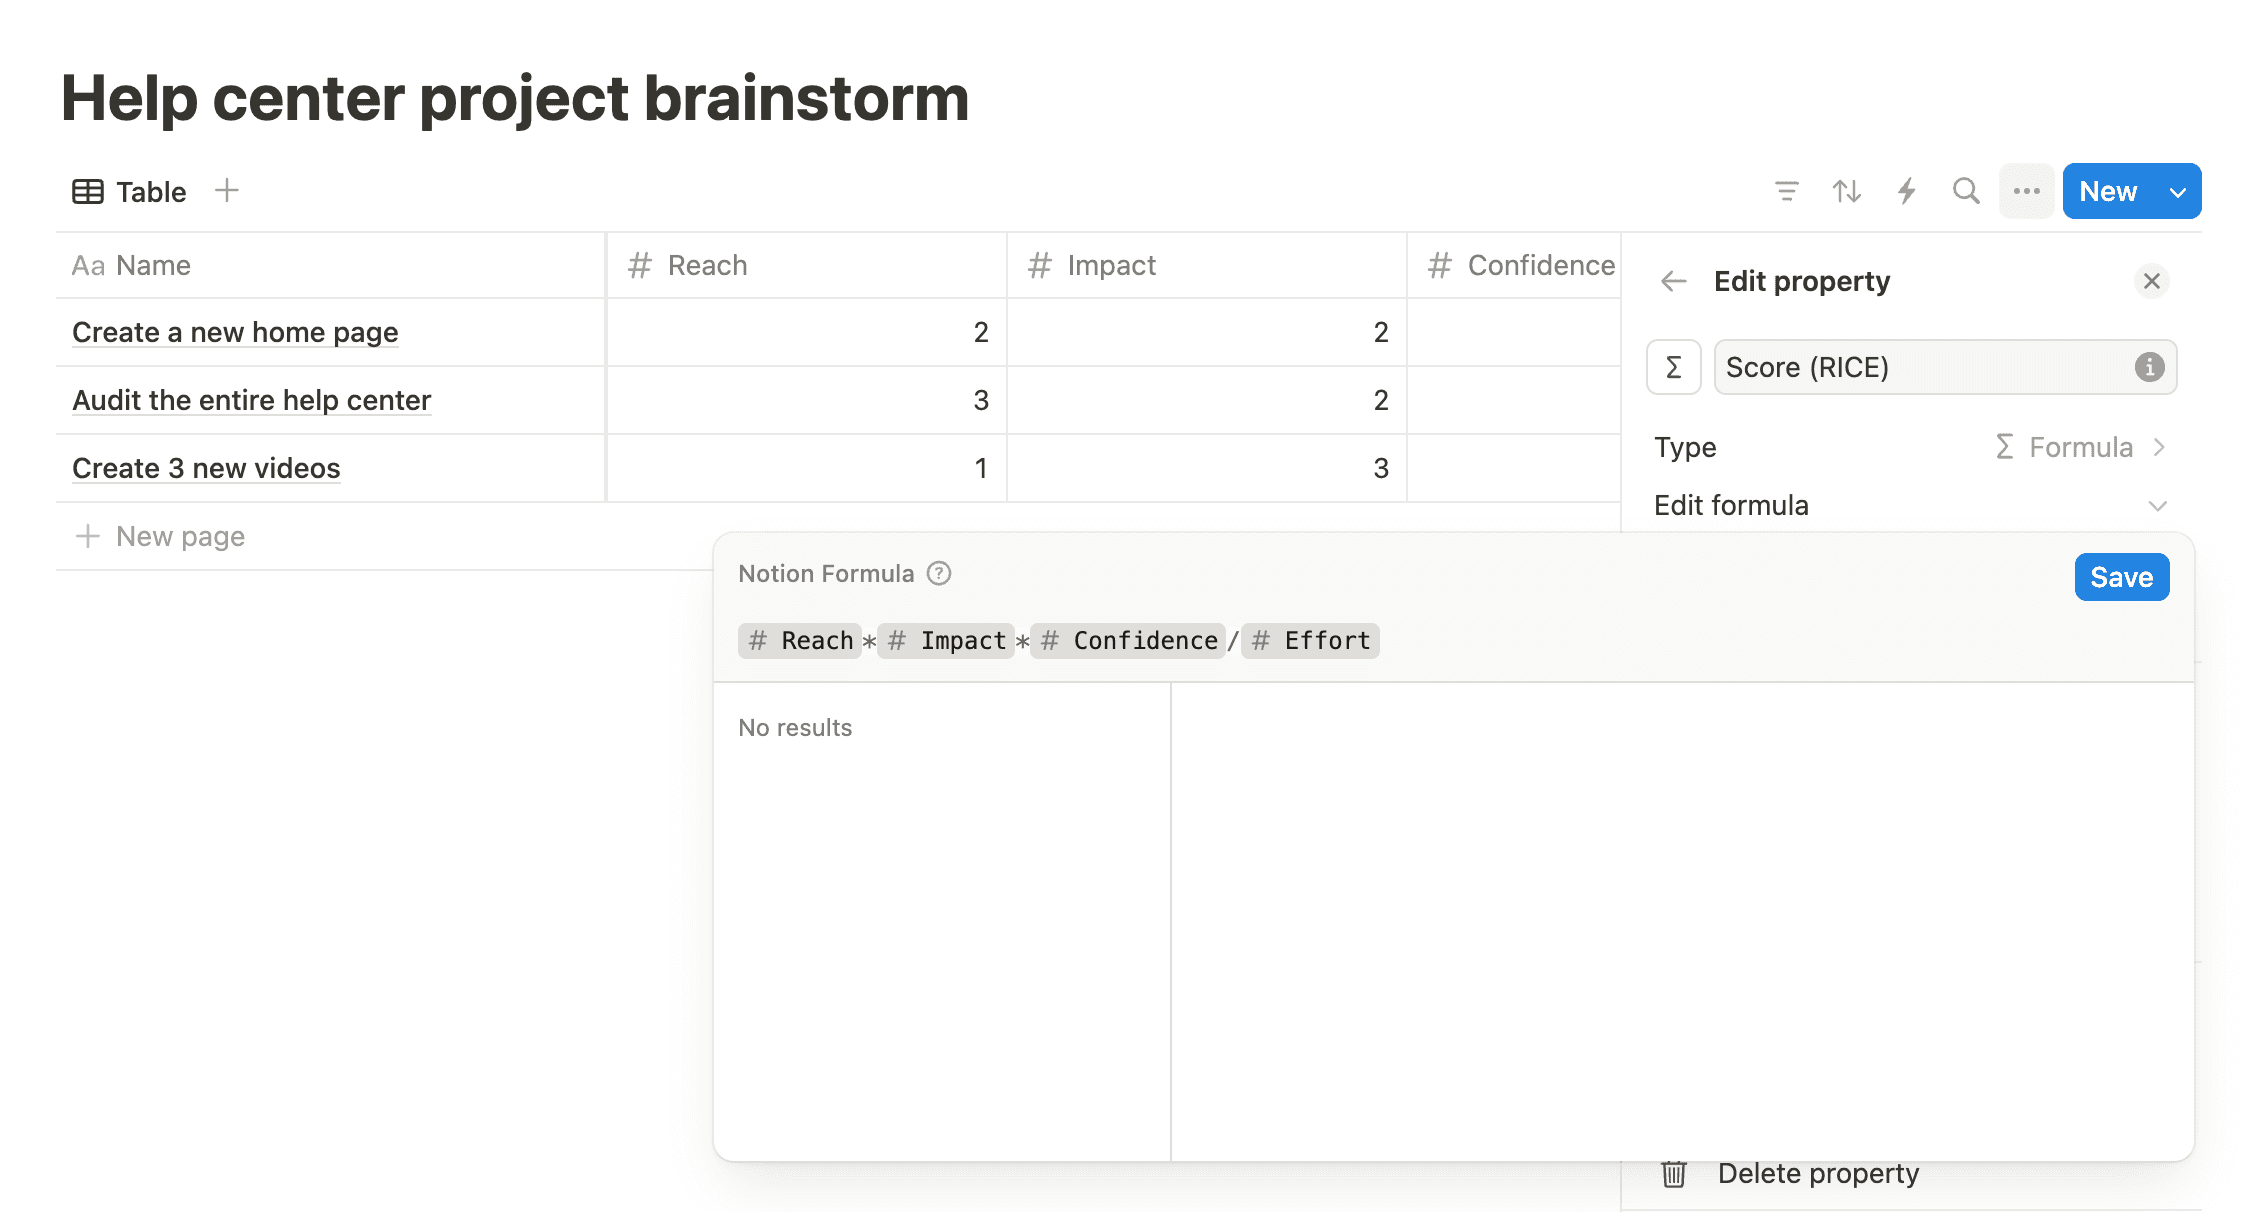
Based off of the scores for Reach, Impact, Confidence, and Effort (RICE), calculate a prioritization score | Score (RICE) |
|
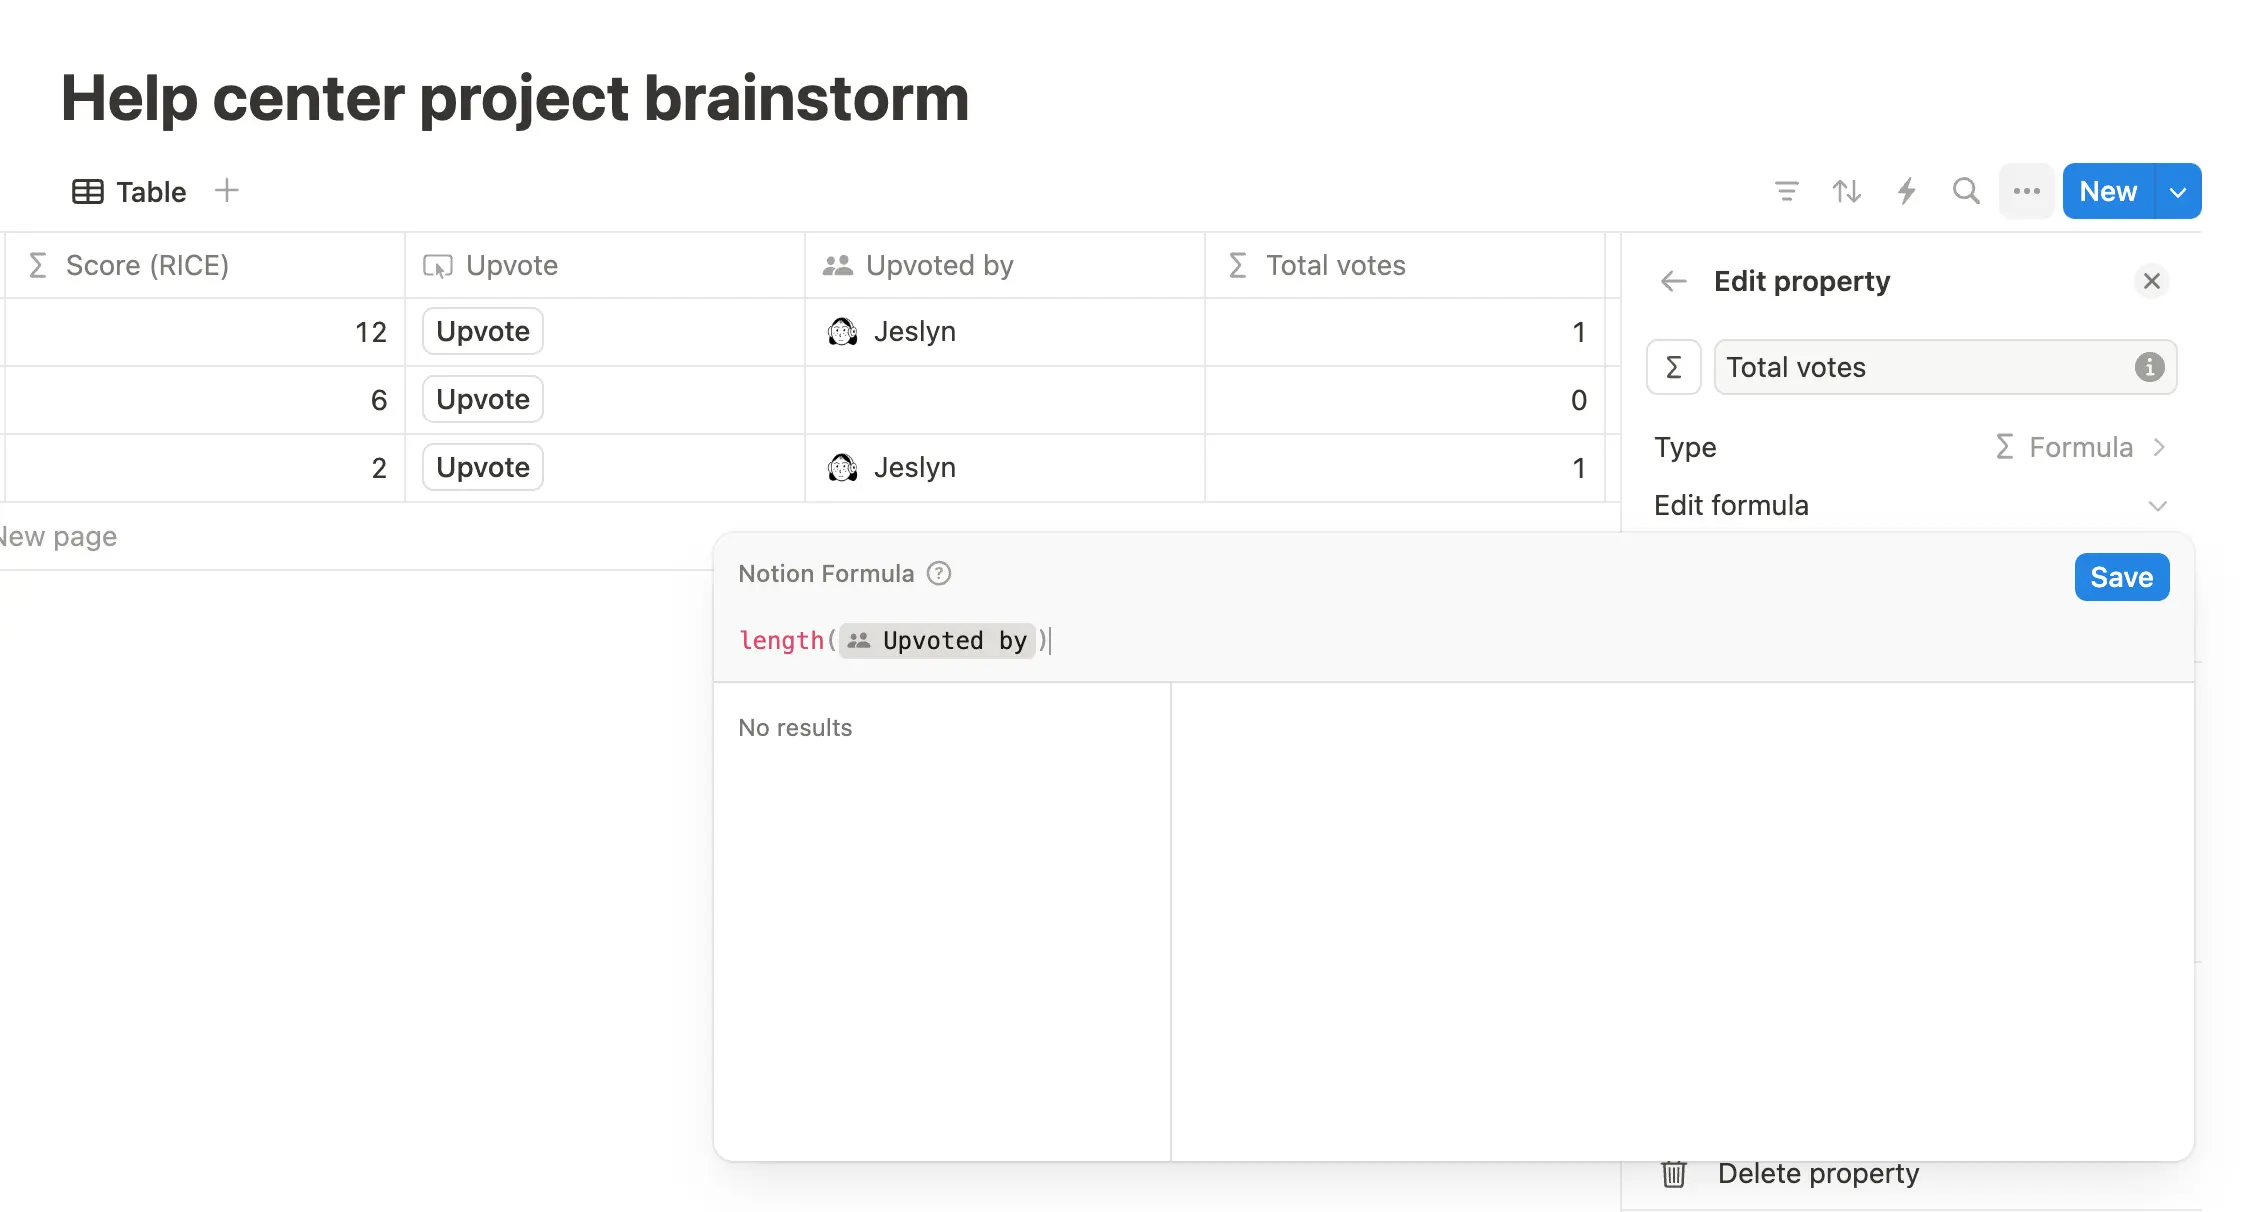
When someone clicks the upvote button, count them toward the number of total votes and add their name to the database page | Total votes |
|
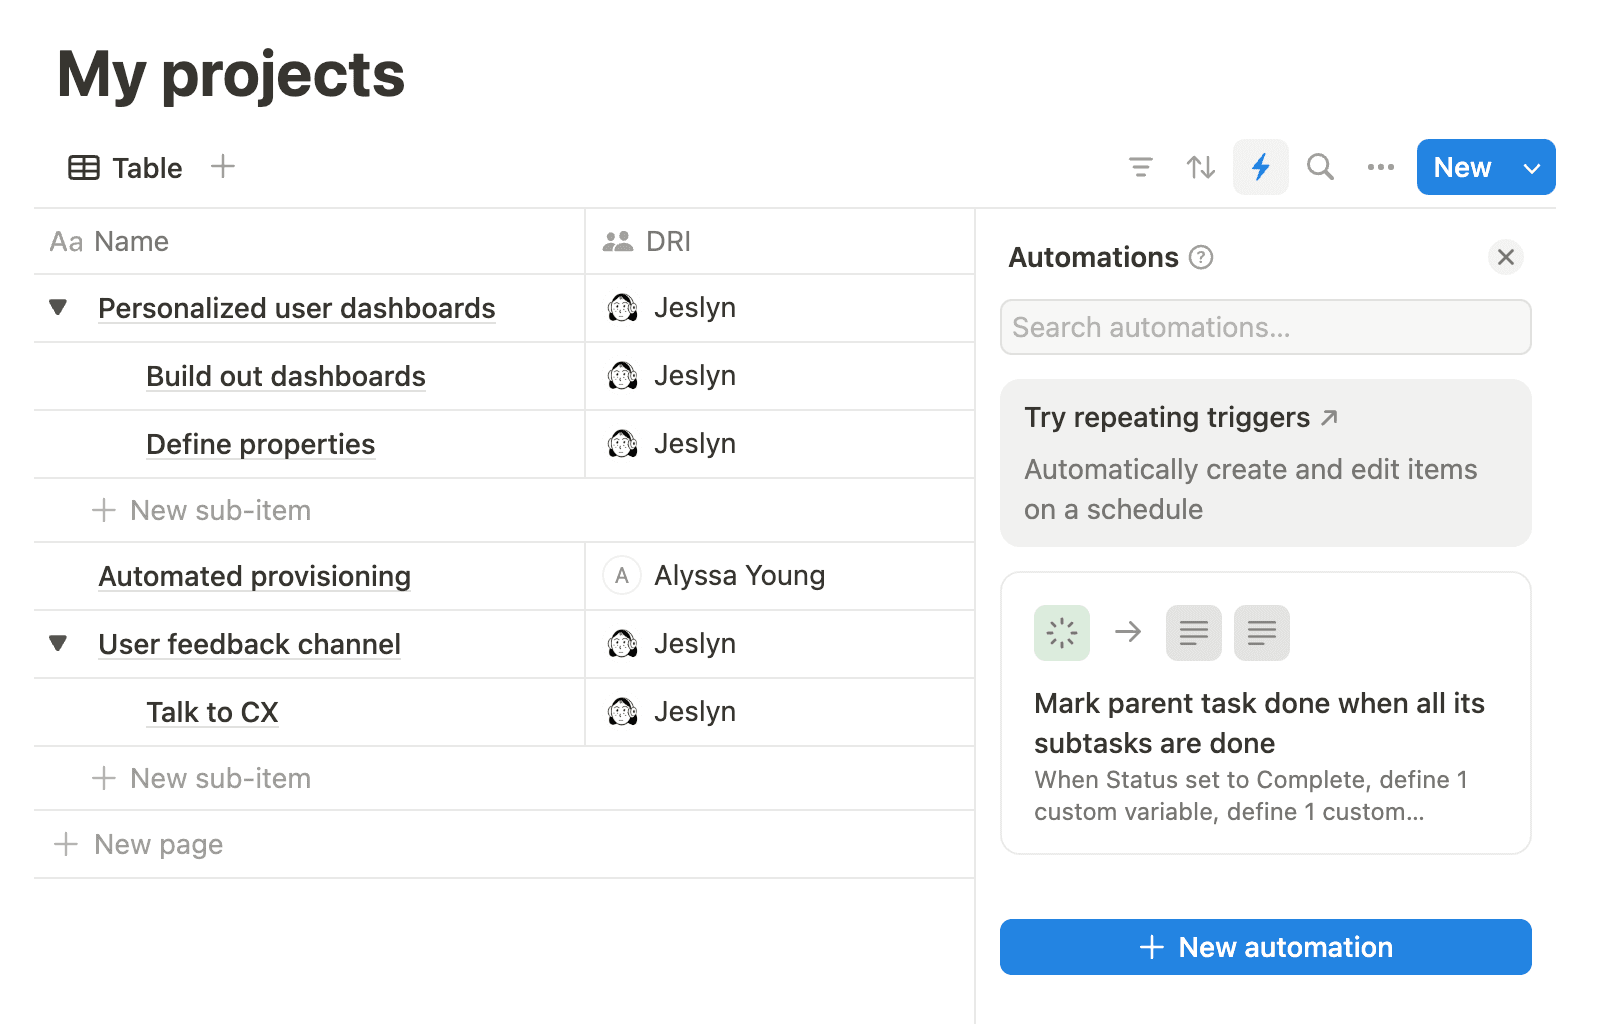
(Advanced) Example 3: Task management automation
In this example, we’ll use some formulas in a database automation (another kind of database property) to make it easier to manage projects and tasks as they’re completed by marking a parent task as Done when all its subtasks are Done.
Database automations have triggers and actions that are taken based on those triggers. Formulas allow you to define variables that you can then use in your actions.
You can explore and play with the formula setups for this example by duplicating this page to your workspace!
Goal | How to build it | Functions and built-ins used |
|---|---|---|
Every time a task is set to | Trigger: When status set to | - |
Define the parent task by finding the first page related to the task that triggered the automation | Action 1: Define Formula: |
Applying the |
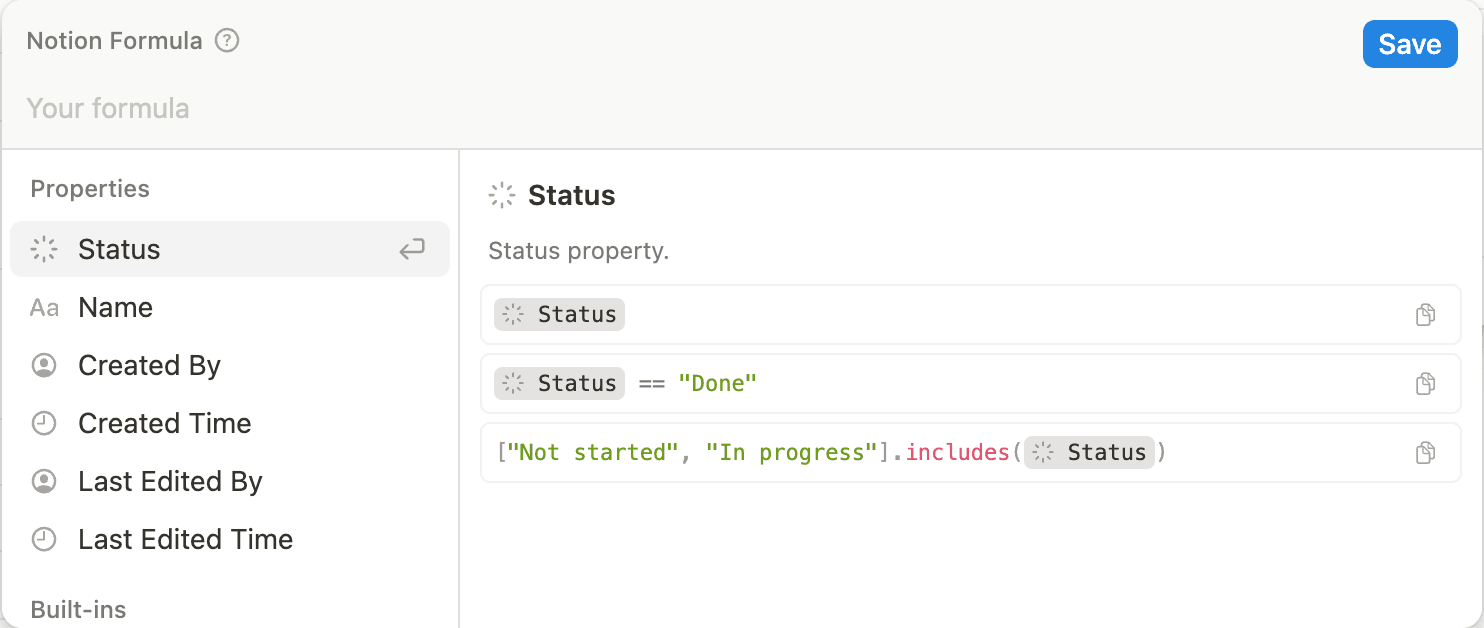
If the parent task has subtasks, verify whether all its subtasks have a status of | Action 2: Define Formula: | The ternary operator
|
If all subtasks are | Action 3: Edit Formula: | Again, the ternary operator is used here to see if all subtasks are done. If they are, the automation will set the parent task’s status as |
More formula inspiration
This Notion template calculates the time between two dates with a formula property.
This Notion template uses a formula to count upvotes for different ideas.
You can find even more example formulas here →
In Notion, you can use formulas in a few different ways:
As a database property, which is what this article primarily covers.
In a button action.
In a database button action.
In a database automation action.
To create a formula database property:
Select the slider icon at the top of a database →
Edit properties→New property.Select
Formula.Give your property a name if you’d like.
Select
Edit formula.
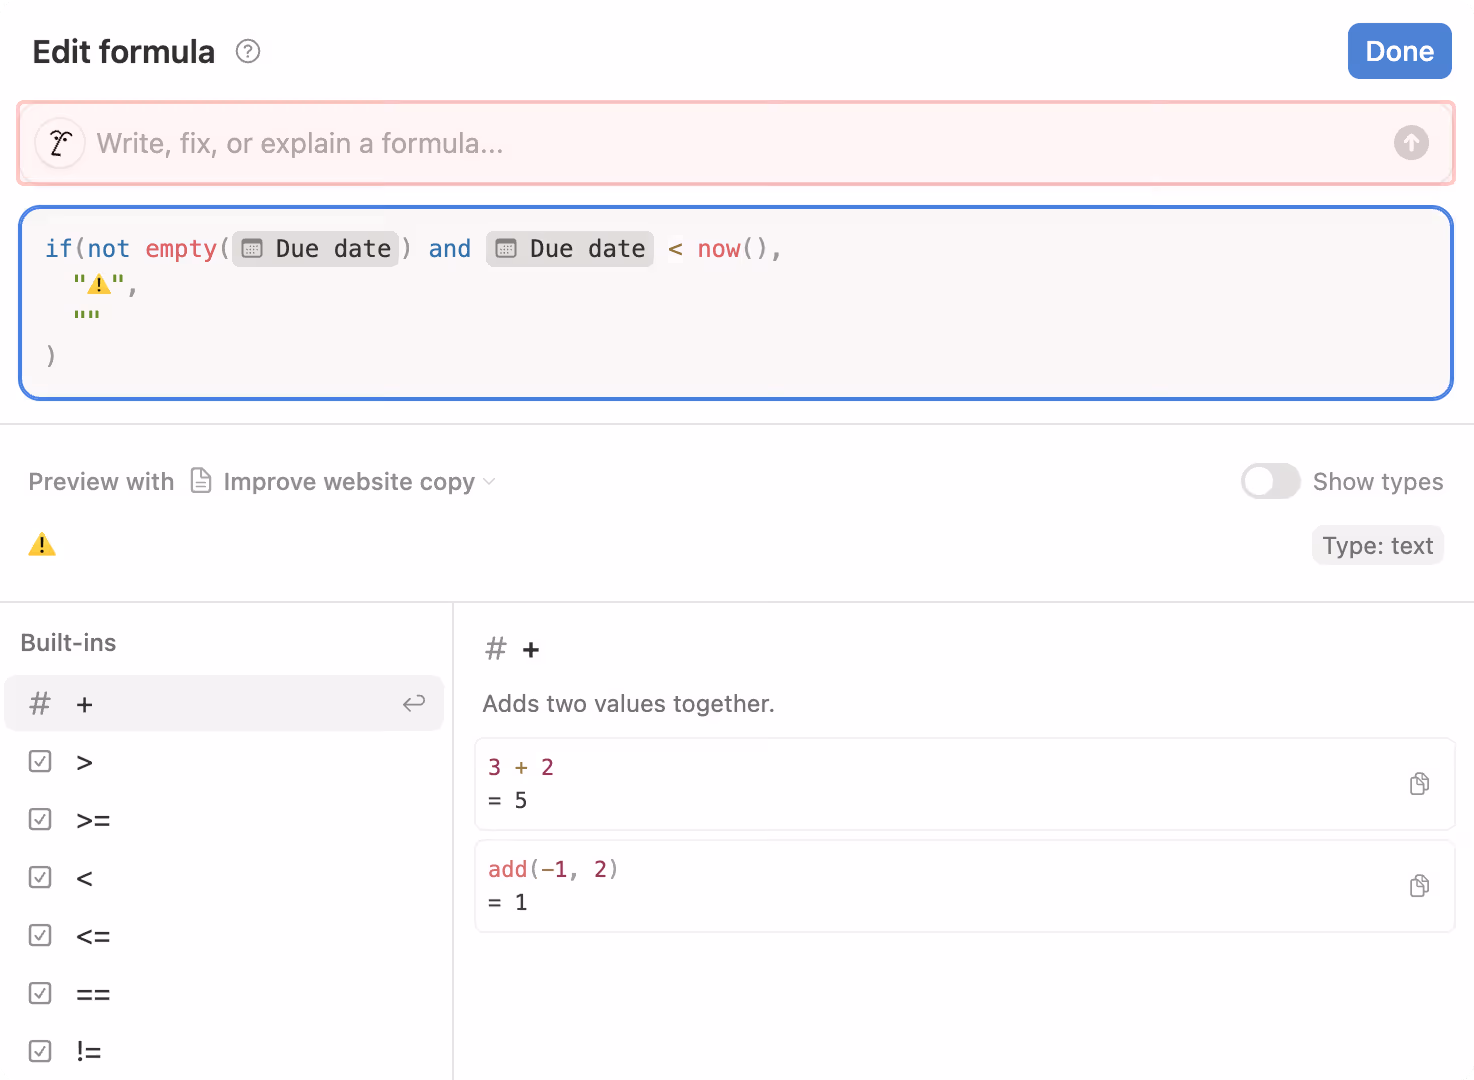
Once you’ve created a formula in a database or button, you’ll be able to build and edit that formula in the formula editor, which looks like this:
The field at the top is where you enter and edit your formula. As you write your formula at the top of the editor, the editor will let you know what’s missing, or what the formula expects in order to return a value to you.
The panel on the left side of the edit shows the elements that you can use in the formula — in other words, the properties, built-ins, and functions that are available to you.
The panel on the right side defines formula elements as you hover over them in the left panel. It also gives you examples of how you might use those elements and how they should be structured.
If you open the formula editor from a database row, you'll see a live preview of the result of the formula for that row.
Having trouble with your formula? Learn about common formula errors and how to troubleshoot them in this article →

Note: This feature is only available on the Business and Enterprise Plans.
Know what you want your formula to do, but not quite sure how to build it? Want to make some tweaks to an existing formula? See an error in your formula, but don’t know how to fix it? Notion AI can help.
When you’re in the formula editor, you’ll see a field containing the Notion AI face. Click into this field and tell Notion AI what you want your formula to do, or ask questions about the formula to understand it better.
Here are some example prompts you can give Notion AI:
“Turn the title property into a URL slug.”
“Return ⚠️ if the due date has passed.”
“Add one day to the date property and make the output green and bold.”
“Return the date property from the related database” (Notion AI knows about your relations’ properties too!)
“Italicize the output of this formula.”
“Fix the errors in this formula.”
“Make this formula handle edge cases.” (For example, Notion AI could add an if statement so that the formula doesn’t fail when a field is empty.)
“What does this formula do?”
Once you enter your prompt, Notion AI will generate a formula or respond to your query about it. You can also see a preview of your formula output as well as toggle on Show types to see the output type (for example, text), so you can make sure everything looks the way you want. You can undo Notion AI's changes, give it further prompts, or give a thumbs up or thumbs down to let us know how it did.
When you’re creating and editing formulas using Notion AI, note that Notion AI currently doesn’t support the following:
Iterative logic (like
forloops).Random generations that would require a
random()function, which Notion formulas don’t have. A prompt like “Generate a random number between 1 and 10” wouldn’t work.Remembering previous prompts.
Notion AI can help you with formula properties as well as formulas inside buttons, database buttons, and database automations.
Formulas can be created using a combination of:
Properties.
Built-ins, or operators and booleans that are used to set up a specific calculation. Some examples include
+(add),false, andor.Functions, or actions that the formula can take to return a certain output. Some examples include
replace,sum, andsort.
A full list of the built-ins and functions that are available in formulas is available here →